How To Love Your Car

Ways to jazz up spruce up and clean up your wheels but include your leather and apply a leather conditioner. Dual action polisher polishes while you wax for incredible depth and it add gloss while leaving swirl free results.

To the office from Monday to Friday, to the supermarket and the beach on weekends, all over the island in search of good food whenever the mood strikes, and cross the borders for a holiday… your car is such an integral part of your daily life, it’s almost part of the family.

Give your car lots of TLC to keep it in tip top condition – that’s your key to happy partnerships! Here’s what you can do.

Car wash

• Wash your car at least once a week to remove surface dirt like dust, mud, grease spots and bird droppings. If the contaminants are not removed quickly, they can stick to the paintwork permanently. Wash and rinse one section at a time, working from top to bottom.

• Never substitute car-washing products for dishwashing liquid or household cleaners. The latter are likely to be too harsh and contain harmful detergents, abrasives and additives that can strip off the wax and damage the paintwork.

• Wash your car in a shaded area or during the cooler parts of the day like early morning or late afternoon. Washing in the hot sun may cause uneven drying, which can leave residue and streaks on your car. After the final rinse, wipe away excess water with a clean terry cloth to prevent watermarks from forming.

• Wax your car at least twice a year to protect it from damage and to maintain color and shine. Waxing helps remove paint oxidation and surface dirt, while adding a protective coating. It can play down or remove minor damage such as surface scratches and light contamination, and provide a high-luster finish.

Tires

• Keep your tires properly inflated. Under-inflation increases heat built-up in the tires, causing them to wear out more on the outside and shorten their lifespan. Over-inflation causes tires to expand more than needed, and also wear them out in the center.

• Each tires wears out a different rate as each supports a different weigh. Tyre rotation should be done every 7,000 to 8,000 km to achieve even tread wear and maximize tread life. Tires should be balanced whenever they are remounted.

• Look out for the tread wear indicator which shows the tires begin to wear out. These lines become visible at approximately 1.5mm below the tire surface – a sign that it’s time to change tires.

• Maintain car tires at the manufacturer’s recommended pressure. Some marques will even advise a different level for front and back tires, and if the car is carrying a heavy load or doing a long distance journey. The spare tire has a lower recommended pressure than the main tires.

Car battery

• The car battery starts the engine when you turn on the ignition. Once the engine is running, the alternator takes over to supply the car’s electrical needs while restoring the charge to the battery. Prolong the life of your battery by getting into the habit of turning off all the lights. Heated rear window and radio before you switch off the car engine.

• To check the condition of your car battery, look for signs of cracks and other physical damage on the battery case and corrosion at the connections of large battery cables. A cracked battery needs to be changed immediately as the electrolyte leaking out is a mixture of sulfuric acid and water.

• Top of the battery with distilled water whenever necessary to ensure that the acid level in each cell is above the plates. If you have a maintenance-free battery, you can skip the battery water, but you still have to check that the battery is secured and the terminals are corrosion-free.

Regular maintenance

• Check the reddish oil puddles under the car as they could mean a leak from either the automatic transmission or power steering systems. The automatic fluid level should not drop below the minimum mark. At should also be clear without any metal filings or black flakes and no burning smell.

• Auto transmission fluid should be changed on schedule; otherwise you will be lubricating your transmission with contaminants. This will shorten the life of your transmission. Transmission fluid doesn’t burn up, so if you find the level dropping, it is quite certain there is a leak somewhere.

• To check the level of engine oil, park your car on level ground and wait for at least five minutes after switching off the car engine. Remove the dipstick, wipe it clean, then replace it and pull it out again. The oil level should be between the maximum mark. If the oil is very black, a complete change may be needed.

• Brake fluid should be replaced at intervals, using the formula recommended by the manufacturer. The fluid must maintain a stable viscosity throughout its operating temperature range. It can absorb moisture and become contaminated. If it id too thick or too thin, braking action is impaired. Keeping clean

• Inspect the windscreen blades whenever you clean your windshield. Don’t want until the rubber is worn or brittle to replace them. You need them in good working condition in a heavy downpour. Make sure the windshield washer fluid reservoir is filled.

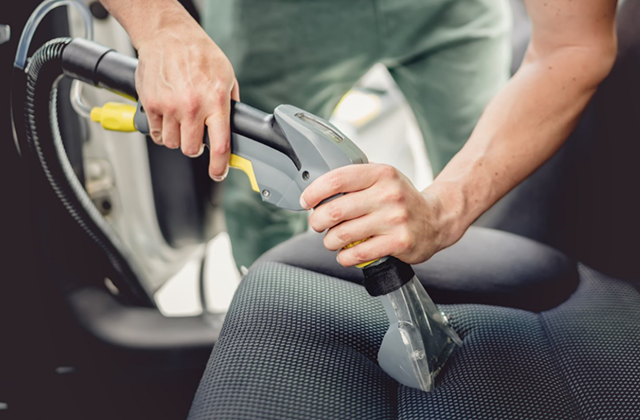
• Give the floor mats a good shake regularly to remove dried mud, leaves or sand hat may be picked up by passengers’ feet. Vacuum frequently to remove dirt from floor carpets and upholstery.

• Spills and stains should be cleaned up as soon as possible to prevent stains from setting. Keep a stash of tissue paper and wet wipes handy to clean dirty spots before carrying out serious cleaning later with the right equipment.

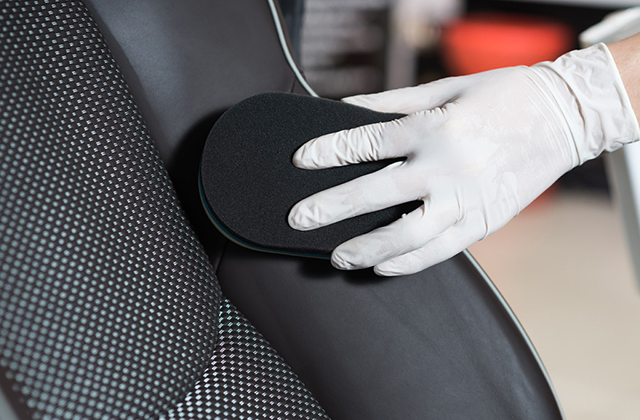
• For leather seats, use a leather and conditioner regularly to prevent the leather from cracking. For upholstered seats, use an appropriate cleaning foam or shampoo, followed by a protective layer. Always check for colorfastness first by testing a small patch in an inconspicuous area.

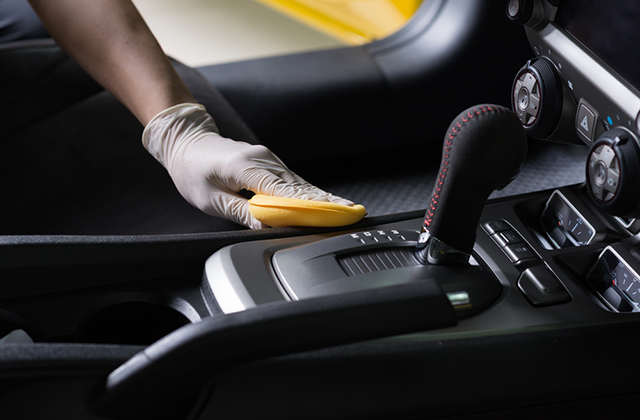
• Keep loose items in a secure place like the glove compartment, side pockets and other cubby holes. If you have ornaments on the dashboard, make sure they are properly secured. Don’t turn these objects into projective if you brake suddenly.

Upgrade and improve

• One way to protect your car interior and upholstery while easing the load on the air-conditioner is to put up heat and UV-resistant window film.

• Send your car for a professional grooming package that takes care of the interior as well. It saves you the hassle of getting your hands dirty. Some vehicle workshops even offer deodorizing and sterilizing treatments that get rid of germs and odors.

• If you can feel every bump and hump your car is going over. The shock absorbers might be worn out and need to be replaces. Not only will the ride be more comfortable with new shock absorbers, but the better handling response also means that your car is able to react more quickly in an emergency. Be sure that the installation is done according to the manufacturer’s recommendation.

• Car spoilers are aerodynamic additions that are normally mounted on top of a car’s trunk or positioned under the front bumper. Spoilers can make a provides a down force for better stability at higher speeds. Go here for spoiler cleaning.

Ink Stains and Gum on Leather

There should be no air where dust can go into areas while you do a buffing machine procedure in your vehicle to avoid further scratch. Have you ever had an accident with ink and leather? Or how about getting gum off of it? Well that’s OK, it’s not the end of the world. If you (or your kids) marked up your sofa or your car seats with a little ink stain or got some gum on your sofa, here are a few solutions for you.

The answers are not quite as easy as you might think, because there are different factors involved in each situation. For instance, with ink stains, you need to consider the type of leather and ink type. Pay attention to the type of leather protector you’re dealing with, and everything should work out fine. Ok, here we go…

Getting Ink Stains Off Leather

When it comes to getting ink stains out of leather, ball point ink is the worst because it’s oil-based. Other types of ink such as a fountain pen or roller ball tend to be easier since they are water-based. That does not mean getting the ink stain out is impossible, just that it might need different methods.

Ink is a dye. So when it makes a mark on leather, it’s quickly absorbed. If the area is small, you might wait a little while to see if the leather absorbs it eliminating the mark. Because of this natural absorption, many solutions used to dissolve ink stains also affect the color of the leather. So whether you use a home remedy or professional solution, always try a small inconspicuous area before tackling the ink stain.

Home Remedies

No matter what type of ink stain, start by using a white, non-abrasive pencil eraser. Make sure the ink stain has not been moistened with water, solvent, or alcohol. Gently rub back and forth until the ink stain begins to fade. This process may need to be done several times before you see the desired results.

Once the ink stain is removed, apply a small amount of uncolored leather polish to the spot. When dry, buff with a clean cloth to shine the leather. This procedure has been found to be very successful for Ostrich, Floater, Buffalo, Alligator, Vitelino, Apache, and Caterina leather but is not a good choice for aniline leather since it has not been treated with a protective material.

Another good home remedy is using mineral spirits. Dampen a small section of a soft, clean cloth and gently rub the ink stain. If you notice the ink spreading, stop immediately. If the ink stain starts to disappear, continue and then allow the leather to dry. When dry, apply a small amount of conditioner.

You can also try dampening a soft clean cloth with hair spray, wood alcohol, a mild multi-purpose automotive interior cleaner, or a mild dish detergent and warm water, and then gently rubbing the ink stain. When dry, apply a small amount of leather polish on the spot, bringing the shine back to the leather.

For remaining spots, dip a cotton swab in rubbing alcohol and treat just the ink stain area by dabbing with the alcohol and cotton swab. Dab with the dry end of the swab to blot up the ink. Try not to spread the alcohol any more than necessary because it has a drying effect on leather. Once the ink stain is removed, wash the area with Dove soap.

Professional Solutions

Stainsafe is a company in Florida that sells a quality Ink and Stain Remover.

Another professional solution is Quick ‘N Brite, which can be applied full strength to a sponge or piece of terrycloth and then gently rubbed over the ink stain in a circular motion. In addition to cleaning, this product is also a good conditioner, helping to soften the leather.

If you find that any solution used discolors the leather slightly, you can purchase a number of leather sprays that will restore your leather to its natural luster, but remember that if you have any doubts, you should talk to professional leather cleaners. Above all, never use any type of solvent or cleaner on leather that you would use on other household items. Because leather is porous and if damaged extensively, it cannot be restored.

Getting Gum off Leather

This is common among families with smaller children. A parent’s worse nightmare, is looking over to see their child sleeping on the car’s leather seats or the leather sofa and there lying beside their head, a big old wad of gum!

One of the easiest ways to remove gum is to freeze it and then just pick it off. To do this without getting the leather wet and leaving a water spot, there are a few options you can.

Two excellent methods include freezing a metal spoon and then placing it directly onto the gum or using a can of pressurized dust removal, which comes out icy cold. You may have to break the gum apart in several pieces but generally, it will come off.

Another option is to do the very opposite. Using a hairdryer on low heat, the gum will become soft which can then be rolled up into a ball and removed.

A small amount of lighter fluid or Naphtha on a Q-tip will help soften the gum so it can be removed easily but be very careful not to touch the Q-tip to the leather or it could damage the color, sheen, or finish.

De-solv-it, which can be purchased at most hardware stores will also work. When using these solutions be sure you wipe the leather after the gum is removed with a clean, damp cloth, and then dry and polish.

If all else fails, professionals recommend you try breaking the gum into smaller pieces, remove the debris, and then take a clean cloth of mild soap and water and wash the spot where the gum was stuck. Polish when dry and your leather should be fine.

*** Hey! Want To Make Something Out Of Leather? ***
Discover How To Make Leather Crafts for Fun and Profit Click Here ==> Leather Work

Leather Repair – Color Matching Your Leather Dyes

An important, but often overlooked car products is the wheel woolies which actually very cheap to use. Color Matching is a huge skill and a must in the leather repair industry. I’ve been coming across a few vehicles lately that have been dyed with not so good color matching. Knowing that it’s usually someone either color blind or just down right…well I won’t go that far, but if the color isn’t right then your repair will look worse then if you had just left it alone. Leather care starts with a non-drying leather cleaner that removes impurities.

Good lighting does help and pretty much a necessity. Natural lighting is better but in the garages we get stuck in the winter months it doesn’t help much, but what do you do, you improvise as my wife says. I use a dent light, which works pretty good, but I have also have used a under the hood light bar then hooking inside the car that stretches the width of the car and hooks on the door jams, they work great. Shorter light bar are great for light in a small places. Be careful with using florescence they sometimes throw your tinting off, if you can get some natural light to your project then great. The customer sees the the car in natural light mostly anyways so your color needs to be spot on.

Test a spot with a dab of leather dye on your finger, wipe a spot in the area to be repaired, dry it, and if it disappears, bingo. Otherwise tint it.

Most of the colors we encounter in today’s cars are tans, grays, blacks of course, some blues, burgundy, not many reds, but I have seen on Mustangs red bolsters, whites in some, and in the custom world, Wow look out. A lot of tricks I would love to learn in doing real custom work like custom airbrushing in the interiors of vehicles, anyways..

The colors I use the most in my leather repair dyes are Black, White, Yellow oxide, Red oxide, and Brown. I also use on occasion Green, Blue, and Purple, rarely Yellow and Red, Silver and Gold for metallics with Pearl white to offset the side tones, and growing everyday, with the growing automotive industry. Colors and more colors, fun, fun, fun…

Of course white and black make gray, and brown and white make tan, so, add a little black to go grayer with tan or darker with both, white to lighten, yellow oxide or red oxide to richen the color or to give the yellow or red tints you see in today’s autos, brown works good sometimes but the browns seem to be on the red side, if it’s too red add green to tone it down. BMWs have a blueish tint to their dyes add a little blue or purple to the grays, Dodge add a little red oxide to the dye to give a reddish tone, Infinity’s light tan has just a hint of green to it, Chevy’s have a little bit more of a yellow-brown look to them in the darker dashes adding a little yellow oxide gives you that tone. Ford has a pretty true grey with a little yellow oxide though in some cases even add a little brown, this is for both the dark and light. Ford trucks tan has kinda a pink look to it, in some older models, add red oxide but they do have a lot of yellow to them too. Cadillac is pretty easy white and brown with a hint of yellow oxide and a bit if black, just a little though. With black tone it down for a duller look with a little bit of white, add your duller and you have flat black sometimes a little brown too for and older Dodge steering wheel but eliminate the duller save that for like BMW dash pieces. Dodge light gray seats add a little purple. Whew..that wore me out. You get the picture I hope, colors are just one of those things either you get it or you don’t.

Just test each time you add a color and look at it and see what color it’s missing. I use my pigments sometimes to get there a little faster. If it looks like it needs a color…add it a little at a time and dab another spot, dry it, then check again. You want it to disappear. If it does then your ready to go. Add your flex, cross-linker, strain your paint with a paper paint strainer into the cup and spray away with your leather dyes on you leather repair. If I left something out and your having problems with a color let me know maybe I can help you figure it out.

I’ve never really sat down and counted the amount of cars that I have done in my 10 years in the automotive reconditioning business so theres been a lot of colors fly in front of my face, the only one that has ever kicked my butt was teal, wow I spent all day when I first started on a boat seat that was teal, holy crap, that was back when I used the lacquer based systems, bad move, I had to give up. With the water based it is so much better. I found with the water based mix that green, blue and a touch of white, I got it, I think I added a little yellow too, I try not to do to many teals, that color and me just don’t get along.

Thats kinda the way I look at it when I go to mixing colors, which I do all by eye, God help me if I go color blind. I just look at the work and see the colors. It’s pretty cool. Each and every car is different no matter if they are the same identical vehicles, each one as been exposed to completely different elements. Every color is different I promise you, premixed dyes are fine to get you there quicker, but check a spot first before you go hog wild and just start dyeing. So tint your dyes, tweak them until they disappear. The color wheel does help, I find myself every once in a while having a brain fart and can’t get a color right so I pull out the old stand by, if it’s the color your trying to get rid of use it’s opposite to get rid of it. Look on the wheel and the color on the opposite side of the wheel, thats it’s opposite. I know that’s not the correct word for that but it sounds good. But I never start my repair until my color matching is right. If you don’t think you can match it, don’t do it. The customer will respect you more for your honesty. If your color doesn’t match then the ending result won’t be perfect, and that’s what the customer wants is perfection in leather repair, or any repair…Right.

Make sure to apply your conditioner after your repair is done on your leather repairs. It will make your ending result look and feel better. Top coat all your repairs with a clear topcoat, it only adds more resistance to the wear and tear and abuse that the vehicles will encounter instead of just the dye.

If you have anything to add to this article I would love to hear from you, these tips can be used with all your color matching needs not just dyeing leather. So please jump on board and lets help all the techs out there and lend a helping hand so that we can ALL get one more step closer to perfection in our leather and vinyl repairs, plastic repairs, velour repairs, and carpet dyeing.

I’ve been in the business for a long time and know a lot of the ends and outs of repairing interiors, from leather and vinyl repair to plastic repair and dyeing of all interior trim parts including carpet and cloth. Need some advice or a tip to fix your autos interior, I’ve put together some really helpful material with some great products I recommend and use in my repairs. Visit our website for more articles just like this one.